


软件

产品


1、首先需要下载OpenFace源码:
(Anaconda、 Git 等自行提前安装)
git clone https://github.com/cmusatyalab/openface.git2、接着进入openface路径
cd openface3、执行:
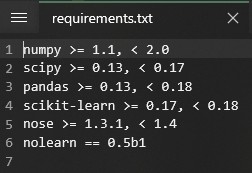
pip install -r requirements.txt4、执行:
python setup.py install需要说明的是,第3步,自动安装可能会很慢或出问题,可以(参考该文件内容)手动安装依赖项。
安装完之后,可以在控制台中,进入python环境,然后导入openface的包看是否报错

可能会有确实其他包的报错,比如报缺少“opencv_python”,缺什么就装什么即可,知道不再报错。
进入
cd models运行
./get-models.sh或者手动下载(参考该文件内容):
1、http://dlib.net/files/shape_predictor_68_face_landmarks.dat.bz2
解压到:【*openface\models\dlib】目录下
2、https://storage.cmusatyalab.org/openface-models/nn4.small2.v1.t7
https://storage.cmusatyalab.org/openface-models/celeb-classifier.nn4.small2.v1.pkl
这两个放到【*openface\models\openface】目录下
import threadingimport cv2 class OpcvCapture(threading.Thread): def __init__(self, win_name, cam_name): super().__init__() self.cam_name = cam_name self.win_name = win_name def run(self): capture = cv2.VideoCapture(self.cam_name) while (True): # 获取一帧 ret, frame = capture.read() cv2.imshow(self.win_name, frame) cv2.waitKey(1) if __name__ == "__main__": camera1 = OpcvCapture("camera1", 1) camera1.start() run_code = 0
路径根据实际进行配置,或将【models】文件夹复制到项目所在位置
import osimport openface fileDir = os.path.dirname(os.path.realpath(__file__))modelDir = os.path.join(fileDir, 'models')dlibModelDir = os.path.join(modelDir, 'dlib') align = openface.AlignDlib(os.path.join(dlibModelDir, "shape_predictor_68_face_landmarks.dat")) def _detector(self, frame, mirror=False): show_img = cv2.flip(frame, flipCode=1) if mirror else frame rects = align.getAllFaceBoundingBoxes(show_img) if len(rects) > 0: bb = align.findLandmarks(show_img, rects[0]) for pt in bb: cv2.circle(show_img, pt, 3, [0, 0, 255], thickness=-1) return show_img在第二节的摄像头画面获取的程序中,每获取到一帧图像后调用检测算法,将返回的结果进行显示:
#摄像头实时画面线程类的部分代码 def run(self): capture = cv2.VideoCapture(self.cam_name) while (True): # 获取一帧 ret, frame = capture.read() # 获取的帧送入检测,绘制检测结果后返回,自拍模式做镜像 show_img = self._detector(frame, mirror=True) cv2.imshow(self.win_name, show_img) cv2.waitKey(1)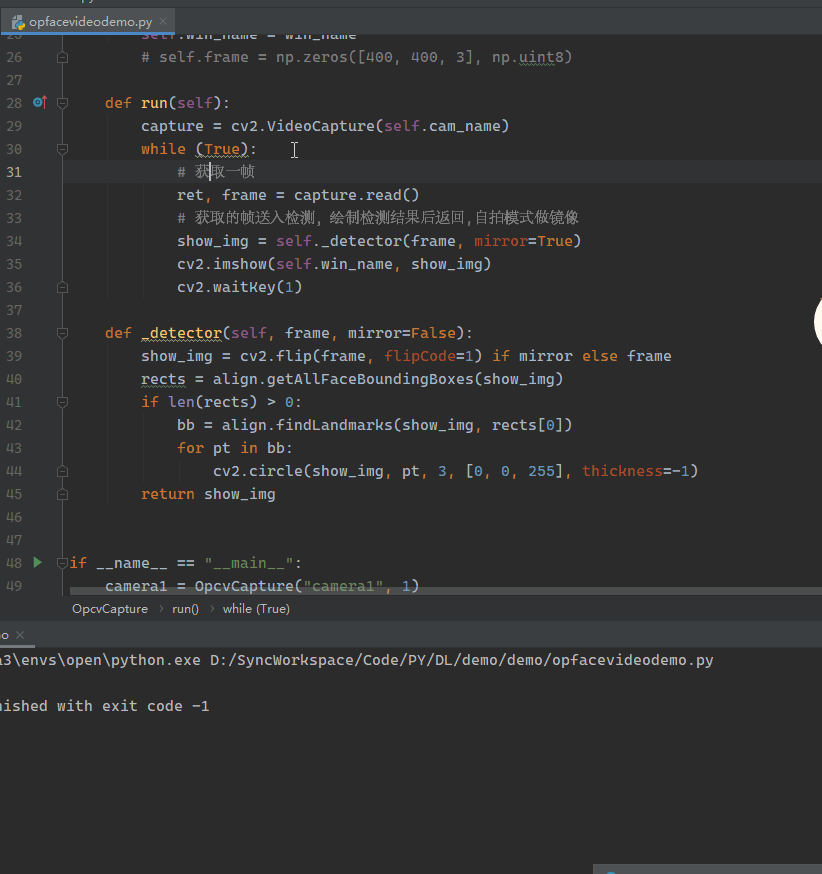
#!/usr/bin/env python# -*- coding:utf-8 -*-# @FileName :opfacevideo.py# @Time :2020/6/20 16:23# @Author :Raink import threadingimport cv2import osimport openface fileDir = os.path.dirname(os.path.realpath(__file__))modelDir = os.path.join(fileDir, 'models')dlibModelDir = os.path.join(modelDir, 'dlib') align = openface.AlignDlib(os.path.join(dlibModelDir, "shape_predictor_68_face_landmarks.dat")) class OpcvCapture(threading.Thread): def __init__(self, win_name, cam_name): super().__init__() self.cam_name = cam_name self.win_name = win_name # self.frame = np.zeros([400, 400, 3], np.uint8) def run(self): capture = cv2.VideoCapture(self.cam_name) while (True): # 获取一帧 ret, frame = capture.read() # 获取的帧送入检测,绘制检测结果后返回,自拍模式做镜像 show_img = self._detector(frame, mirror=True) cv2.imshow(self.win_name, show_img) cv2.waitKey(1) def _detector(self, frame, mirror=False): show_img = cv2.flip(frame, flipCode=1) if mirror else frame rects = align.getAllFaceBoundingBoxes(show_img) if len(rects) > 0: bb = align.findLandmarks(show_img, rects[0]) for pt in bb: cv2.circle(show_img, pt, 3, [0, 0, 255], thickness=-1) return show_img if __name__ == "__main__": camera1 = OpcvCapture("camera1", 1) camera1.start()
免责声明:本文系网络转载或改编,未找到原创作者,版权归原作者所有。如涉及版权,请联系删
 技术文档
技术文档
 推荐好文
推荐好文


 155-2731-8020


