


软件

产品


还有效果更好的,高 精度 轻量级关键点网络,参考我的另一篇博文:
轻量级高精度人脸关键点推荐_jacke121的专栏-CSDN博客
带人脸关键点,pc版70多ms,还可以,戴口罩也有效果,侧脸低头偶尔有偏差
GitHub - Jiahao-UTS/SLPT-master
又发现效果比较好的:
https://github.com/OAID/TengineKit
关键点数据集:
WFLW_images.tar.gz
标注:
WFLW_annotations.tar
SLIM
这个好像是1ms的,关键点和姿态都有,效果比较好,比下面pytorch_face_landmark的好,但是不能区分眨眼:
slim网络结构,有训练代码,wingloss:
https://github.com/hommmm/Peppa-Facial-Landmark-PyTorch
测试代码:
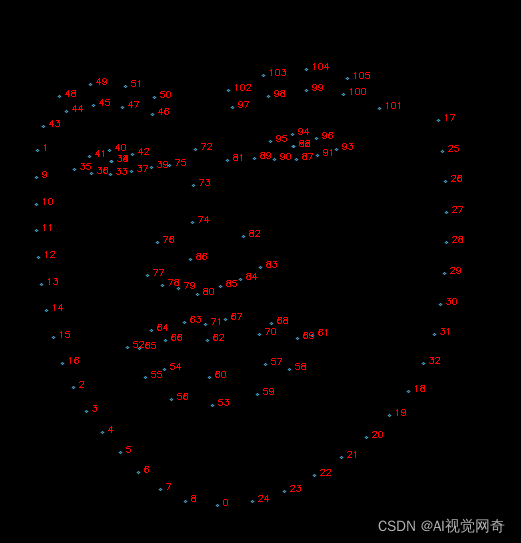
import time import cv2import torchimport torch.onnxfrom models.slim import Slimimport onnxruntime as rtimport numpy as np def export(): x = torch.randn(1, 3, 160, 160) model = Slim() model.load_state_dict(torch.load("../pretrained_weights/slim_160_latest.pth", map_location="cpu")) model.eval() torch.onnx.export(model, x, "../pretrained_weights/slim_160_latest.onnx", input_names=["input1"], output_names=['output1']) if __name__ == '__main__': im_size=160 sess = rt.InferenceSession("../pretrained_weights/slim_160_latest.onnx") input_name = sess.get_inputs()[0].name im = cv2.imread(r'd:\qinlan3.jpg') im = cv2.resize(im, (im_size, im_size)) crop_image = (im - 127.0) / 127.0 crop_image = np.array([np.transpose(crop_image, (2, 0, 1))]).astype(np.float32) start = time.time() raw = sess.run(None, {input_name: crop_image})[0][0] end = time.time() print("ONNX Inference Time: {:.6f}".format(end - start)) font = cv2.FONT_HERSHEY_SIMPLEX img_black = np.zeros([800, 800, 3], np.uint8) img_black = cv2.resize(im, (800, 800)) lmks = (np.array(raw[0:136])*160).astype(np.int) lmks=lmks[:136].reshape(-1,2) for point in lmks: im = cv2.circle(im, tuple(point), 2, (0, 255, 0), -1, 1) # frame = cv2.putText(frame, "Pitch: {:.4f}".format(PRY_3d[0]), (20, 20), cv2.FONT_HERSHEY_SIMPLEX, 0.8, # (0, 255, 0), 1, 1) # frame = cv2.putText(frame, "Yaw: {:.4f}".format(PRY_3d[1]), (20, 40), cv2.FONT_HERSHEY_SIMPLEX, 0.8, # (0, 255, 0), 1, 1) # frame = cv2.putText(frame, "Roll: {:.4f}".format(PRY_3d[2]), (20, 60), cv2.FONT_HERSHEY_SIMPLEX, 0.8, # (0, 255, 0), 1, 1) color = (200, 160, 75) pred_black = np.round(raw[0:136] * 800).astype(np.int).reshape(-1,2) for i in range(pred_black.shape[0]): p = tuple(pred_black[i]) img_black = cv2.putText(img_black, str(i), tuple(p), font, 0.3, (0, 0, 255), 1) cv2.circle(img_black, p, 1, color, 1, cv2.LINE_AA) cv2.imshow('img_black', img_black[200:, 100:]) cv2.imshow("Peppa ", im) cv2.waitKey(0) 一键获取完整项目代码python运行
神力ai出的98个关键点
8ms左右,但是飘的很严重,基本不能用。
人脸,人头都能检测,还有人头姿态
https://github.com/jacke121/headpose_final
https://github.com/rafabs97/headpose_final
gpu,头部姿态需要8ms
效果不错,不能区分眨眼
https://github.com/cunjian/pytorch_face_landmark
test_camera_pfld_onnx.py 50ms
ort_session_landmark = onnxruntime.InferenceSession("pfld.onnx")test_camera_light_onnx.py
onnx_path = "models/onnx/version-RFB-320.onnx"效果不好:
https://github.com/polarisZhao/Facial-Landmark-Detection
https://github.com/MUST-AI-Lab/HRNet-Facial-Landmark-Detection
https://github.com/emilianavt/OpenSeeFace
https://github.com/KristianMSchmidt/Kaggle-Google-Landmark-Competetition
有数据集:
https://github.com/cunjian/pytorch_face_landmark
tf 1070 64*64 7ms,可能和torch不兼容
https://github.com/songhengyang/face_landmark_factory
无预训练:
https://github.com/srivastava41099/Facial-Keypoint-Detection
https://github.com/yanuartadityan/cnn-facefeature-detection
https://github.com/jacke121/cnn-facefeature-detection
我自己加了一个detect.py
15个关键点:
This is a quick 4-layers single pool CNN for detecting 15 face keypoints.
81个,有误差,不是特别准,特别快,1ms
https://github.com/codeniko/shape_predictor_81_face_landmarks
https://github.com/justusschock/shapenet
效果一般,不准
#!/usr/bin/env python# -*- coding: utf-8 -*-import time import cv2import mathfrom shapenet.networks.feature_extractors import Img224x224Kernel7x7SeparatedDimsfrom shapenet.networks.utils import CustomGroupNormimport torchimport pytestimport numpy as np @pytest.mark.parametrize("num_outputs,num_in_channels,norm_class,p_dropout", [ (16, 1, torch.nn.InstanceNorm2d, 0.1), (16, 1, torch.nn.BatchNorm2d, 0.5), (16, 1, CustomGroupNorm, 0.5), (75, 125, torch.nn.InstanceNorm2d, 0.), (75, 125, torch.nn.BatchNorm2d, 0.), (75, 125, CustomGroupNorm, 0.) ])def test_224_img_size_7_kernel_size_separated_dims(num_outputs, num_in_channels, norm_class, p_dropout): net = Img224x224Kernel7x7SeparatedDims(num_in_channels, num_outputs, norm_class, p_dropout) state_dict = torch.load('pretrained_face.ptj') net.load_state_dict(state_dict) net.cuda() net.eval() input_tensor = torch.rand(1, num_in_channels, 224, 224).cuda() for i in range(1): start = time.time() out= net(input_tensor)#.shape == (16, num_outputs, 1, 1) print('time', time.time() - start) print(out) if __name__ == '__main__': # num_outputs= (16, 1, torch.nn.InstanceNorm2d, 0.1) # from shapenet.jit import JitHomogeneousShapeLayer # from shapenet.jit import JitShapeNetwork # import torch import numpy as np net= torch.jit.load('pretrained_face.ptj') net.cuda() net.eval() vc = cv2.VideoCapture(0) # 读入视频文件 d = 0 exit_flag = False c = 0 index = 1 while True: # 循环读取视频帧 image=cv2.imread('shu.jpg') c += 1 # if c % 2 == 1: # continue # image_origin = cv2.cvtColor(image, cv2.COLOR_BGR2RGB) images = [] images_origin = [] start=time.time() image = cv2.resize(image, (224, 224))#, # interpolation=cv2.INTER_LINEAR) image_origin = image image=cv2.cvtColor(image,cv2.COLOR_BGR2RGB) # image -= np.array((104.00699, 116.66877, 122.67892)) image = cv2.cvtColor(image, cv2.COLOR_BGRA2GRAY) image = image.astype(np.float32) image = image/ 255.0 image = image.transpose((1, 0)) images_origin.append(image_origin) # keep for save result # image /= 255.0 # image = np.transpose(image, (2, 0, 1)) # image = np.transpose(image, (1, 0)) # image = image.astype(np.float32) images.append(image) print("time", (time.time() - start)) images = np.asarray([images]) images_cuda = torch.from_numpy(images).cuda() out=net(images_cuda) angle=-45 angle=math.pi/(180/angle) center_x=112 center_y=112 for i,point in enumerate(out[0]): x=point[1] y=point[0] srx = (x - center_x) * np.cos(angle) + (y - center_y) * np.sin(angle) + center_x sry = (y - center_y) * np.cos(angle) - (x - center_x) * np.sin(angle) + center_y cv2.circle(image_origin, (int(srx),int(sry)), 2, (0, 0, 255), -1) if i>30: break cv2.imshow('asdf',image_origin) cv2.waitKey(1) # def test_jit_equality(): # layer_kwargs = {"shapes": np.random.rand(26, 68, 2), # "n_dims": 2, # "use_cpp": False} # # input_tensor = torch.rand(10, 1, 224, 224) # # jit_net = JitShapeNetwork(JitHomogeneousShapeLayer, layer_kwargs) # # out= torch.jit.trace(jit_net, (torch.rand(1, 1, 224, 224))) # # test_224_img_size_7_kernel_size_separated_dims(75, 125, torch.nn.BatchNorm2d, 0)
免责声明:本文系网络转载或改编,未找到原创作者,版权归原作者所有。如涉及版权,请联系删
 技术文档
技术文档
 推荐好文
推荐好文


 155-2731-8020


