【第四范式】实习职位:AI产品研发
- 项目一:要素提取 项目二:文本聚类功能测试 项目三:爬虫 项目四:word和PDF内容对比 项目五:去除页眉页脚 项目六:基于OCR返回的json结果去除图片水印 项目七:Word内容关键字段抽取 项目八:文件比对项目服务开发 Airflow,Minio相关概念和作用原理 Airflow Minio git相关
项目一:要素提取
描述:根据接口API需求文档,实现创建任务,启动任务,查看任务状态以及下载任务等业务功能
- 工具:Postman,Pycharm,Navicat,Git
- 干货:
- 写代码中get的经验
- 将Flask项目部署到服务器Docker上,参考本人另一篇博文的第4部分
项目二:文本聚类功能测试
描述:主要是在 GPU 服务器上黑盒测试一个已开发完成的功能模块,保证交付给客户时能够正常运行。
- 文本聚类包括特征提取和聚类模型
- 代码需要在服务器上跑起来,但是服务器用的是python2.7,很多库和代码不兼容,而且不允许使用root安装python3.x运行代码,怎么办?——非root用户安装anaconda
- 跑通的代码需要加上requirements.txt
-在package目录下 pip freeze > requirements.txt
项目三:爬虫
描述:基于Google爬虫,爬取页面搜索结果内容
- 工具:Pycharm,Monocloud
- 必要条件:挂VPN(使用MonoCloud)
- 可用的开源项目:Magic-Google 里面的示例项目中PROXIES的配置需要修改为 PROXIES = [{ 'https': 'http://127.0.0.1:7078' }] 其中的7078端口是MonoCloud的默认流量端口(即Setting页中的Local port),MonoCloud中的Mode设置为Global: 主要原理:(MonoCloud官网截图)
- python如何测试request访问Google配置信息: import requests print(requests.get('https://www.google.com',proxies={'https':'http://127.0.0.1:7078'}).content) 一键获取完整项目代码python运行12
- 写入csv文件发现每两行中间空一行,open()添加newline参数 解决:with open(‘xxx.csv’, ‘w’,newline =’’ ) as fcsv:
- 读取txt文件每行会换行+空行输出 f = open(file, encoding='utf-8') lines = f.readlines() # 读取全部内容 ,并以列表方式返回 for line in lines: line = line.strip('\n') 一键获取完整项目代码python运行1234
- 多线程爬虫 在主线程中使用join,让主线程挂起等待所有子线程结束,代码如下: import threading import time def run(): time.sleep(2) print('当前线程的名字是: ', threading.current_thread().name) time.sleep(2) if __name__ == '__main__': start_time = time.time() print('这是主线程:', threading.current_thread().name) thread_list = [] for i in range(5): t = threading.Thread(target=run) thread_list.append(t) for t in thread_list: t.setDaemon(True) t.start() for t in thread_list: t.join() print('主线程结束了!' , threading.current_thread().name) print('一共用时:', time.time()-start_time) 一键获取完整项目代码python运行1234567891011121314151617181920212223
- 记录程序运行时间 start = time.time() time.sleep(3) #执行相关逻辑 end = time.time() print("主程序执行结束,总消耗时间 {} s".format(end-start)) 一键获取完整项目代码python运行1234
- 遍历文件夹读取文件 import os # 遍历文件夹 def walkFile(file): file_group = [] for root, dirs, files in os.walk(file): # root 表示当前正在访问的文件夹路径 # dirs 表示该文件夹下的子目录名list # files 表示该文件夹下的文件list for f in files: file_group.append(f) # 遍历所有的文件夹 for d in dirs: print(os.path.join(root, d)) return file_group PATH = './province_road/' #读取同级目录文件夹province_road下的所有文件 files = walkFile(PATH) for f in files: print(f) ...#do something ``` 一键获取完整项目代码python运行12345678910111213141516171819202122
项目四:word和PDF内容对比
描述:对比word和pdf中不同的内容,然后把更改信息以批注的形式添加到word文件中
- 向Word添加批注
- 安装win32com报错:No matching distribution found for win32com 解决方法:python -m pip install pypiwin32
- 去除PDF中的红色印章 import sys, fitz, os, datetime import time from PIL import Image import numpy as np # import tabula ''' fitz库是什么,它是pymupdf中的一个模块,操作PDF非常舒服,只需要pip安装即可: pip install pymupdf ''' def pyMuPDF_fitz(pdfPath, imagePath, zoomNum): startTime_pdf2img = datetime.datetime.now() # 开始时间 print("imagePath=" + imagePath) pdfDoc = fitz.open(pdfPath) for pg in range(pdfDoc.pageCount): page = pdfDoc[pg] rotate = int(0) # 每个尺寸的缩放系数为1.3,这将为我们生成分辨率提高2.6的图像。 # 此处若是不做设置,默认图片大小为:792X612, dpi=96 # zoom_x = 1.33333333 #(1.33333333-->1056x816) (2-->1584x1224) zoom_x = zoomNum # (1.33333333-->1056x816) (2-->1584x1224) # zoom_y = 1.33333333 zoom_y = zoomNum mat = fitz.Matrix(zoom_x, zoom_y).preRotate(rotate) pix = page.getPixmap(matrix=mat, alpha=False) if not os.path.exists(imagePath): # 判断存放图片的文件夹是否存在 os.makedirs(imagePath) # 若图片文件夹不存在就创建 if pg < 10: pg_str = '00' + str(pg) elif 10 <= pg < 100: pg_str = '0' + str(pg) else: pg_str = str(pg) pix.writePNG(imagePath + '/' + '%s.png' % pg_str) # 将图片写入指定的文件夹内 endTime_pdf2img = datetime.datetime.now() # 结束时间 print('pdf2img时间=', (endTime_pdf2img - startTime_pdf2img).seconds, '秒') def pyMuBinaryzation(binaryzationpath): startTime_pdfbinaryzation = datetime.datetime.now() # 开始时间 file_list = os.listdir(binaryzationpath) pic_name = [] for x in file_list: if "jpg" in x or 'png' in x or 'jpeg' in x: pic_name.append(x) for i in pic_name: image = Image.open(binaryzationpath + '/' + i) new_file_name = binaryzationpath + '/' + i picArray = np.array(image) # 解析图片成 numpy矩阵 ''' 以下是加深150以下的 并且不相等的 ''' red_data = picArray[..., 0] green_data = picArray[..., 1] blue_data = picArray[..., 2] red_green = red_data - green_data red_blue = red_data - blue_data red_150_1 = np.int64(red_data < 160) green_150_1 = np.int64(green_data < 150) blue_150_1 = np.int64(blue_data < 150) red_green_1 = np.int64(red_green != 0) black_150_index = np.where(red_150_1 + green_150_1 + blue_150_1 + red_green_1 == 4) picArray[black_150_index] = [0, 0, 0] ''' 以下是加深100以下 并且相等值的 ''' red_data = picArray[..., 0] green_data = picArray[..., 1] blue_data = picArray[..., 2] red_green = red_data - green_data red_blue = red_data - blue_data red_100_1 = np.int64(red_data < 100) red_green_100 = np.int64(red_green == 0) red_blue_100 = np.int64(red_blue == 0) black_100_index = np.where(red_100_1 + red_green_100 + red_blue_100 == 3) picArray[black_100_index] = [0, 0, 0] ''' 以下是红色情况的去除 ''' red_data = picArray[..., 0] green_data = picArray[..., 1] blue_data = picArray[..., 2] red_green = red_data - green_data red_blue = red_data - blue_data red_green1 = np.int64(red_green > 10) red_blue1 = np.int64(red_blue > 10) red_index = np.where(red_green1 + red_blue1 == 2) picArray[red_index] = [255, 255, 255] ''' 以下是去除200以上的 ''' red_data = picArray[..., 0] green_data = picArray[..., 1] blue_data = picArray[..., 2] red_green = red_data - green_data red_blue = red_data - blue_data red_200_1 = np.int64(red_data > 200) green_200_1 = np.int64(green_data > 200) blue_200_1 = np.int64(blue_data > 200) white_200_index = np.where(red_200_1 + green_200_1 + blue_200_1 == 3) picArray[white_200_index] = [255, 255, 255] im = Image.fromarray(picArray) im.save(new_file_name) endTime_pdfbinaryzation = datetime.datetime.now() # 结束时间 print('pdfpdfbinaryzation时间=', (endTime_pdfbinaryzation - startTime_pdfbinaryzation).seconds, '秒') def pyMuPicToPdf(picDir, outfilepath): startTime_PicToPdf = datetime.datetime.now() # 开始时间 file_list = os.listdir(picDir) pic_name = [] im_list = [] print(file_list) for x in file_list: if "jpg" in x or 'png' in x or 'jpeg' in x: pic_name.append(x) pic_name.sort() im1 = Image.open(picDir + '/' + pic_name[0]) pic_name.pop(0) for i in pic_name: img = Image.open(picDir + '/' + i) # im_list.append(img) if img.mode == "RGBA": img = img.convert('RGB') im_list.append(img) else: im_list.append(img) im1.save(outfilepath, "PDF", resolution=100.0, save_all=True, append_images=im_list) endTime_PicToPdf = datetime.datetime.now() # 结束时间 print('PicToPdf时间=', (endTime_PicToPdf - startTime_PicToPdf).seconds, '秒') def deleteDir(path): try: for i in os.listdir(path): path_file = os.path.join(path, i) if os.path.isfile(path_file): os.remove(path_file) if os.path.exists(path): # 如果文件夹 # 删除文件,可使用以下两种方法。 os.rmdir(path) # os.unlink(path) else: print('no such file:%s' % path) # 则返回文件不存在 except Exception as e: print(e) def mainProcess(fileName, outfilepath='', zoomNum=8): # 2或8 ''' 主函数入口 :param fileName:需要去章的文件路径 :param outfilepath:需要输出的文件路径,包括文件名,默认在同目录下生成 xxx_out.pdf 文件 :param zoomNum:转换成图片的比例,影响运行速度,数值越大,去章效果越好,执行时间越长,默认为2 :return: ''' startTime = datetime.datetime.now() # 开始时间 (filepath, tempfilename) = os.path.split(fileName) # 解析fileName (filename, extension) = os.path.splitext(tempfilename) # 解析文件名 文件类型 if not outfilepath: outfilepath = filepath + '/' + filename + '_out' + extension outdir = filepath + '/' + filename pyMuPDF_fitz(fileName, outdir, zoomNum) # 将pdf文件解析出图片 pyMuBinaryzation(outdir) # 对图片进行去章 pyMuPicToPdf(outdir, outfilepath) # 将图片合成pdf deleteDir(outdir) # 删除图片文件夹 endTime = datetime.datetime.now() # 结束时间 print('总耗时=', (endTime - startTime).seconds, '秒') if __name__ == '__main__': fileName = r'./documents/2-技术协议.pdf' mainProcess(fileName) # 入口函数 一键获取完整项目代码python运行123456789101112131415161718192021222324252627282930313233343536373839404142434445464748495051525354555657585960616263646566676869707172737475767778798081828384858687888990919293949596979899100101102103104105106107108109110111112113114115116117118119120121122123124125126127128129130131132133134135136137138139140141142143144145146147148149150151152153154155156157158159160161162163164165166167168169170171172173174175176177178179180181
- 基于pickle文件的sequence内容对比解析
- 文件内容对比详细流程: 1. 输入是一个word文件,一个pdf文件,需要将二者的文本差异信息,以批注的形式插入到word的对应位置 2. 将word转换成pdf 3. 将两个pdf通过OCR文字识别,转换成txt 4. 经过difflib对比生成对比结果,得到pickle文件中保存的list 5. 根据list中的信息将更改内容批注到word文件中 一键获取完整项目代码12345 思路:其实难点就是解析difflib库的文本比对结果,对difflib不明白的可以看DifferExample,返回的结果是类似这样的列表: from pprint import pprint pprint(result) [' 1. Beautiful is better than ugly.\n', '- 2. Explicit is better than implicit.\n', '- 3. Simple is better than complex.\n', '+ 3. Simple is better than complex.\n', '? ++\n', '- 4. Complex is better than complicated.\n', '? ^ ---- ^\n', '+ 4. Complicated is better than complex.\n', '? ++++ ^ ^\n', '+ 5. Flat is better than nested.\n'] 一键获取完整项目代码python运行123456789101112 解析:有两个文本txt1,txt2 开头是’-’,说明是txt1中独有的句子 开头是’+’,说明是txt2中独有的句子 开头是’?’,说明上一句中对应哪一部分是特有的,^表示对应上面一句所在的文本txt1(txt2)的下标的字符相对于另一个文本txt2(txt1)是更新的, 其他情况,说明是txt1和txt2共有的 根据比较结果出现的情况,合法的排列组合可包括: {"-?+?","-?+","-+?","-","+"," "},在下面的代码中为了便于分析,将空格改成了“x”。 然后提取每一行的第一个字符,利用最大匹配原则得到匹配结果的排列组合。 [’-?+’, ‘-+?’, ‘-’, ‘x’, ‘x’, ‘x’, ‘-?+?’, ‘x’, ‘x’, ‘x’, ‘x’, ‘x’, ‘x’, ‘-?+’, ‘-?+’, ‘+’, ‘-?+?’, ‘+’] 最后就是对每种出现的排列组合进行处理。 源代码: import win32com #python -m pip install pypiwin32 from win32com.client import Dispatch import sys import pickle from pprint import pprint import copy word_dict=["-?+?","-?+","-+?","-","+","x"] #构建diff的合法排列组合 def positive_max_matching(words): for word in words:#分别对每行进行正向最大匹配处理 max_length = 4 word_list = [] len_hang = len(word) while len_hang>0 : tryWord = word[0:max_length] while tryWord not in word_dict: if len(tryWord)==1: break tryWord=tryWord[0:len(tryWord)-1] word_list.append(tryWord) word = word[len(tryWord):] len_hang = len(word) return word_list def prepare_result(predict_list): contents = [] header_list = [] word_str = "" for diff in predict_list: if(diff[0]=='-' or diff[0]=='+' or diff[0]=='?'): word_str += diff[0] if(diff[0]=='?'): contents.append(diff[2:-1]) continue else:#遇到空格,说明该句是公共句 word_str += 'x' contents.append(diff[2:]) header_list.append(word_str) return header_list,contents def process_result(predict_list,contents,header_combination): index = 0 ans = [] # ans=[{word1_sentence,word1_sentence_to_add_comments,comments}] for hc in header_combination: # print(hc) if(hc=='-?+?'): str1 = contents[index] str1_diff = list(contents[index+1]) str1_diff_cp = copy.deepcopy(str1_diff) str2 = contents[index+2] str2_diff = list(contents[index+3]) str2_diff_cp = copy.deepcopy(str2_diff) for i,c in enumerate(str1_diff): # print(i,"***",c) if(c=='-'): str1_diff[i] = str1[i] #字符串不支持通过下标的方式直接赋值修改,需要把字符串转list if(c=='^'): str1_diff[i] = str1[i] for i,c in enumerate(str2_diff): if(c=='+'): str2_diff[i] = str2[i] #逆向记录+前面的内容,最多逆向扫描之前5个字符 tmp = i-1 add_str1 = [] times = 0 while(tmp>=0 and str2_diff_cp[tmp]==' '): times += 1 add_str1.insert(0,str2[tmp]) tmp -= 1 if(times>=5): break if(add_str1!=[]): add_str1 = ''.join(add_str1) # print('add_str1:', add_str1) str1_diff.append(' '+add_str1)#加空格是为了后面好分割 str1_diff_cp.append(' '+'+') if (c == '^'): str2_diff[i] = str2[i] str1_diff = ''.join(str1_diff) # 用空串将列表中的所有字符重新连接为字符串 str1_diff_cp = ''.join(str1_diff_cp) words1 = str1_diff.strip().split(' ') cmds1 = str1_diff_cp.strip().split(' ') print(hc,words1, cmds1) str2_diff = ''.join(str2_diff) str2_diff_cp = ''.join(str2_diff_cp) words2 = str2_diff.strip().split(' ') cmds2 = str2_diff_cp.strip().split(' ') print(hc,words2, cmds2) #构造批注json for i,c in enumerate(cmds1): if(c[0]=='^'): ans.append({"word1_sentence":str1, "word1_sentence_to_add_comments":words1[i], "comments":"信息更改\n", "info":"PDF中在此处更改的内容:"+words2[i]}) elif(c[0]=='+'): ans.append({"word1_sentence": str1, "word1_sentence_to_add_comments": words1[i], "comments": "信息添加\n", "info": "PDF中在'{}'此处之后添加了内容:{}".format(words1[i],words2[i])}) elif (c[0] == '-'): ans.append({"word1_sentence": str1, "word1_sentence_to_add_comments": words1[i], "comments": "信息删除\n", "info": "PDF中在此处删除的内容:" + words1[i]}) index += 4 elif(hc=='-?+'): str1 = contents[index] str1_diff = list(contents[index + 1]) str1_diff_cp = copy.deepcopy(str1_diff) str2 = contents[index + 2] for i,c in enumerate(str1_diff): # print(i,"***",c) if(c=='-'): str1_diff[i] = str1[i] #字符串不支持通过下标的方式直接赋值修改,需要把字符串转list if(c=='^'): str1_diff[i] = str1[i] str1_diff = ''.join(str1_diff) # 用空串将列表中的所有字符重新连接为字符串 str1_diff_cp = ''.join(str1_diff_cp) words1 = str1_diff.strip().split(' ') cmds1 = str1_diff_cp.strip().split(' ') print(hc,words1, cmds1) # 构造批注json for i, c in enumerate(cmds1): if (c[0] == '^'): ans.append({"word1_sentence": str1, "word1_sentence_to_add_comments": words1[i], "comments": "信息更改\n", "info": "PDF中在此处更改了内容"}) elif (c[0] == '-'): ans.append({"word1_sentence": str1, "word1_sentence_to_add_comments": words1[i], "comments": "信息删除\n", "info": "PDF中在此处删除的内容:" + words1[i]}) index += 3 elif (hc == '-+?'): str1 = contents[index] str1_diff = list([]) str1_diff_cp = copy.deepcopy(str1_diff) str2 = contents[index + 1] str2_diff = list(contents[index + 2]) str2_diff_cp = copy.deepcopy(str2_diff) for i,c in enumerate(str2_diff): if(c=='+'): str2_diff[i] = str2[i] #逆向记录+前面的内容,最多逆向扫描之前5个字符 tmp = i-1 add_str1 = [] times = 0 while(tmp>=0 and str2_diff_cp[tmp]==' '): times += 1 add_str1.insert(0,str2[tmp]) tmp -= 1 if(times>=5): break if(add_str1!=[]): add_str1 = ''.join(add_str1) # print('add_str1:', add_str1) str1_diff.append(' '+add_str1)#加空格是为了后面好分割 str1_diff_cp.append(' '+'+') if (c == '^'): str2_diff[i] = str2[i] str1_diff = ''.join(str1_diff) # 用空串将列表中的所有字符重新连接为字符串 str1_diff_cp = ''.join(str1_diff_cp) words1 = str1_diff.strip().split(' ') cmds1 = str1_diff_cp.strip().split(' ') print(hc, words1, cmds1) str2_diff = ''.join(str2_diff) str2_diff_cp = ''.join(str2_diff_cp) words2 = str2_diff.strip().split(' ') cmds2 = str2_diff_cp.strip().split(' ') print(hc, words2, cmds2) # 构造批注json for i, c in enumerate(cmds1): if (c[0] == '^'): ans.append({"word1_sentence": str1, "word1_sentence_to_add_comments": words1[i], "comments": "信息更改\n", "info": "PDF中在此处更改的内容:" + words2[i]}) elif (c[0] == '+'): ans.append({"word1_sentence": str1, "word1_sentence_to_add_comments": words1[i], "comments": "信息添加\n", "info": "PDF中在'{}'此处之后添加了内容:{}".format(words1[i],words2[i])}) index += 3 elif(hc=='-'): str1 = contents[index] ans.append({"word1_sentence": str1, "word1_sentence_to_add_comments": str1, "comments": "信息删除\n", "info": "PDF中在此处删除的内容:" + str1}) index += 1 elif(hc=='+'): tmp = index-1 while(tmp>=0 and (predict_list[tmp][0]=='+'or predict_list[tmp][0]=='?'or predict_list[tmp][0]=='^')): tmp -= 1 pre_str1 = contents[tmp] str1 = contents[index] ans.append({"word1_sentence": pre_str1, "word1_sentence_to_add_comments": pre_str1[-5:], "comments": "信息添加\n", "info": "PDF中在'{}'此处之后添加了内容:{}".format(pre_str1[-5:],str1)}) index += 1 elif(hc=='x'): index += 1 continue return ans def addComment2docx(file_path,ans,isVisible): word = Dispatch('Word.Application') word.Visible = isVisible path = sys.path[0] + file_path doc = word.Documents.Open(FileName=path, Encoding='gbk') # print(doc.paragraphs[0]) # 打印文档第一段 s = word.Selection s.Start = s.End = 0 for obj in ans: res = s.Find.Execute(obj['word1_sentence_to_add_comments']) if (res): doc.Comments.Add(Range=word.Selection.Range, Text=obj['comments'] + obj['info']) print('添加批注成功!') else: print('未在文件中找到对应文本:{},添加批注失败.'.format(obj['word1_sentence_to_add_comments'])) s.Start = s.End # 光标向前推进 def run(pickle_file,add_comments_file_path,isVisible): with open(pickle_file, 'rb') as f: predict_list = pickle.load(f, encoding='bytes') header_list,contents = prepare_result(predict_list) header_combination = positive_max_matching(header_list) ans = process_result(predict_list,contents,header_combination) addComment2docx(add_comments_file_path,ans,isVisible) if __name__ == '__main__': pickle_file = 'compare_results.pickle' file_path = '/documents/diff_test1.docx' isVisible = 1 #是否可视化添加批注流程 run(pickle_file,file_path,isVisible) print("finished.") 一键获取完整项目代码python运行123456789101112131415161718192021222324252627282930313233343536373839404142434445464748495051525354555657585960616263646566676869707172737475767778798081828384858687888990919293949596979899100101102103104105106107108109110111112113114115116117118119120121122123124125126127128129130131132133134135136137138139140141142143144145146147148149150151152153154155156157158159160161162163164165166167168169170171172173174175176177178179180181182183184185186187188189190191192193194195196197198199200201202203204205206207208209210211212213214215216217218219220221222223224225226227228229230231232233234235236237238239240241242243244245
- 第二版的需求需要在Linux上运行,但是Win32com这个包只能在windows系统上运行,因此需要重新设计向word插入批注的方法 主要依赖包:python-docx, bayoo-docx 步骤: pip install python-docx pip install bayoo-docx 一键获取完整项目代码python运行12 插入批注的样例代码: import docx document = docx.Document() paragraph1 = document.add_paragraph('text') # create new paragraph comment = paragraph.add_comment('comment',author='Obay Daba',initials= 'od') # add a comment on the entire paragraph paragraph2 = document.add_paragraph('text') # create another paragraph run = paragraph2.add_run('texty') add a run to the paragraph run.add_comment('comment') # add a comment only for the run text run.add_comment('comment2') run_comments = run.comments paragraph.add_footnote('footnote text') # add a footnote 一键获取完整项目代码python运行1234567891011 但是bayoo-docx插入批注的方法只能是通过新建paragraph或者新建run,然后add_comment(“xxxx”),而且word的paragraph中的run并不统一,通过遍历原文档的方法不能随心所欲的在paragraph中的某一部分run加批注,也就是需要自定义run模块。 思路: 原文档按行遍历,将每行按照批注分割,再依次插入新的word文档 获取word文档中的段落,表格等信息: import docx # document = docx.Document() # document.save('demo.docx') def get_docx_content(file): para_contents = [] table_contents = [] total_comtents = [] doc = docx.Document(file) # 获取段落的内容 for para in doc.paragraphs: try: para_contents.append(para.text.replace(u'\xa0', u' ')) total_comtents.append(para.text.replace(u'\xa0', u' ')) # runs = para.runs # print("****para:", para.text) # for i, item in enumerate(runs): # print(i, item.text) except: continue # 获取表格的内容 tbs = doc.tables for tb in tbs: tb_contents = [] # print(len(tb.rows),len(tb.columns)) for row in tb.rows: # 行 for cell in row.cells: # 列 if (cell.text == ''): continue tb_contents.append(cell.text.replace(u'\xa0', u' ')) total_comtents.append(cell.text.replace(u'\xa0', u' ')) table_info = {'rows': len(tb.rows), 'cols': len(tb.columns), 'contents': tb_contents} table_contents.append(table_info) return para_contents, table_contents, total_comtents if __name__ == '__main__': file = './documents/xxx.docx' para_contents, table_contents, total_contents = get_docx_content(file) print(para_contents) print() print(table_contents) 一键获取完整项目代码python运行12345678910111213141516171819202122232425262728293031323334353637383940 获取word中对象(包括表格)的相对位置: from docx.document import Document from docx.oxml.table import CT_Tbl from docx.oxml.text.paragraph import CT_P from docx.table import _Cell, Table from docx.text.paragraph import Paragraph import docx def iter_block_items(parent): if isinstance(parent, Document): parent_elm = parent.element.body elif isinstance(parent, _Cell): parent_elm = parent._tc else: raise ValueError("something's not right") for child in parent_elm.iterchildren(): if isinstance(child, CT_P): yield Paragraph(child, parent) elif isinstance(child, CT_Tbl): yield Table(child, parent) # table = Table(child, parent) # for row in table.rows: # for cell in row.cells: # for paragraph in cell.paragraphs: # yield paragraph from collections import defaultdict def get_object_location_in_word(file): doc = docx.Document(file) index_dict = defaultdict(list) for i,block in enumerate(iter_block_items(doc)): # print(block.style.name) if block.style.name == 'Normal Table': print("表格") index_dict['table'].append(i) elif block.style.name == 'Normal': print("自然段") elif block.style.name == 'List Paragraph': print("List Paragraph") elif block.style.name == 'Normal (Web)': print("Normal (Web)") return index_dict if __name__ == '__main__': file = './documents/xxxx.docx' index_dict = get_object_location_in_word(file) print(index_dict) 一键获取完整项目代码python运行1234567891011121314151617181920212223242526272829303132333435363738394041424344454647484950 Linux平台实现Word转为PDF 子项目:Gitlab cicd运用之.git-ci.yml文件配置持续集成
项目五:去除页眉页脚
参考本人另一篇博客,传送门
项目六:基于OCR返回的json结果去除图片水印
描述:针对公司的 OCR识别 系统可能会将水印也识别出来的问题,通过json结果去掉水印的识别框和对应的文本内容。
方法步骤:
1.在json中解析绿色框的格式:
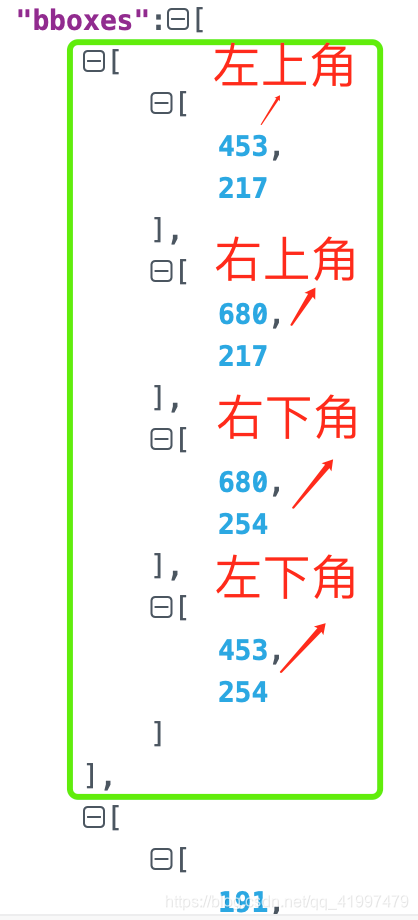
2.根据结果可以发现,绿色框一定是矩形,通过坐标计算每个框的斜率。
list=[X坐标值,Y坐标值]
def cal_slope(list1,list2):
    if(list2[0]==list1[0]):
        return None #x坐标相等,斜率不存在
    else:
        return (list2[1]-list1[1])/(list2[0]-list1[0])
3.通过所有框斜率进行KMeans聚类(k=2),即可分为两个簇
from sklearn.cluster import KMeans #pip install sklearn
box_slope_list = [0.1,0.2,0.4,0.5,...] #存入的斜率值list,待进行一维数据聚类
def cluster_slope(box_slope_list):
    box_slope_array = np.array(box_slope_list, dtype=int).reshape(-1, 1)
    km = KMeans(n_clusters=2) #k=2聚类
    km.fit(box_slope_array)
    cluster_result = km.predict(box_slope_array)
    return cluster_result
4.计算两个簇对应文本的平均相似度(文本两两比较),将簇内文本相似度较大的一类识别为水印
import difflib
def string_similar(s1, s2):
    return difflib.SequenceMatcher(None, s1, s2).quick_ratio()
5.根据簇的索引,对水印进行去除
收获:
1.将json字符串存为文件:
import json
target_json_path = '../../upload/result.json'
with open(target_json_path,'w',encoding='utf-8') as file_obj:
    json.dump(rst,file_obj,ensure_ascii=False,indent=4)
2.通过索引遍历dataframe的每行:
for i in range(0,len(df)):
	print(df.iloc(i,df['列名']))
项目七:Word内容关键字段抽取
需求:基于word转为txt的结果,将字符串中的关键信息提取出来
比如提取出甲方地址,该信息占txt中的一行:
地址:[XX市XX区XX街道XX路88号]
普通语法:
dic = {}
if('甲方地址' not in dic.keys() and '地址' in line and ':' in line):
	owner_addr = line.split(':')[1]
	dic['甲方地址'] = owner_addr.replace('[', '').replace(']', '')
正则表达式的运用:
import re
if ('甲方联系地址' not in dic.keys()):
    pattern = re.compile(r'^.*?地址:(.*?)$')
    matchobj = pattern.match(line)
    if (matchobj and len(matchobj.groups()) >= 1):#大于等于后面的数字取决于正则表达式中括号的数量
        owner_addr = matchobj.group(1)
        dic['甲方联系地址'] = owner_addr.replace('[', '').replace(']', '')
知识点:
Python 正则表达式用法
- re.compile 函数
compile 函数用于编译正则表达式,生成一个正则表达式( Pattern )对象,供 match() 和 search() 这两个函数使用。
语法格式为:
re.compile(pattern[, flags])
	参数:
	pattern : 一个字符串形式的正则表达式
	flags : 可选,表示匹配模式,比如忽略大小写,多行模式等,具体参数为:
		re.I 忽略大小写
		re.L 表示特殊字符集 \w, \W, \b, \B, \s, \S 依赖于当前环境
		re.M 多行模式
		re.S 即为 . 并且包括换行符在内的任意字符(. 不包括换行符)
		re.U 表示特殊字符集 \w, \W, \b, \B, \d, \D, \s, \S 依赖于 Unicode 字符属性数据库
		re.X 为了增加可读性,忽略空格和 # 后面的注释
- ^ 匹配字符串的开头
- $ 匹配字符串的末尾。
- re中的
(): 对正则表达式分组并记住匹配的文本,比如上述例子中地址:(.*?)的括号,方便直接取出匹配成功后想要的子串。 - m.group(0) : 返回匹配成功的整个子串
- m.group(1) : 返回第一个分组匹配成功的子串
- m.groups() : 等价于 (m.group(1), m.group(2), …)
项目八:文件比对项目服务开发
需求:根据用户传入的两份文件,后端需要通过转PDF,OCR识别,去文本、页眉页脚、印章等流程得到文本字符串和对应的OCR定位box框组合成Json,需要通过 Airflow 封装成API服务,结合minio文件上传服务提供给前端。
收获:
Airflow,Minio相关概念和作用原理
Airflow
Airflow入门原理讲解
关键概念:
- Airflow 是一个使用 python 语言编写的 data pipeline 调度和监控工作流的平台。 Airflow 核心原理是通过 DAG(Directed acyclic graph 有向无环图)来管理任务流程的任务调度工具, 不需要知道业务数据的具体内容,设置任务的依赖关系即可实现任务调度。
- 在一个可扩展的生产环境中,Airflow 含有以下组件:
- 一个DAG里有一个或者多个Task,每一个Task都负责执行一段业务功能完整的核心代码,比如一个Dag表示做高考卷子,那么定义的task包括「TaskA:做语文卷子,Task B:做数学卷子…」
- 使用位移符号来表示一个Dag中的各个task执行顺序:
task1 >> task2 >> task3等价于
- 定义Dag和Task的执行顺序Demo:
Minio
个人理解:专用于对象云端存储的系统,配合前后端解耦开发,如果有复杂类型文件(比如文件、视频、图片)的前后端存取交互,minio相当于一个中间池,后端指定一个minio的bucket传上去,前端再从这个相同的bucket取就行了。
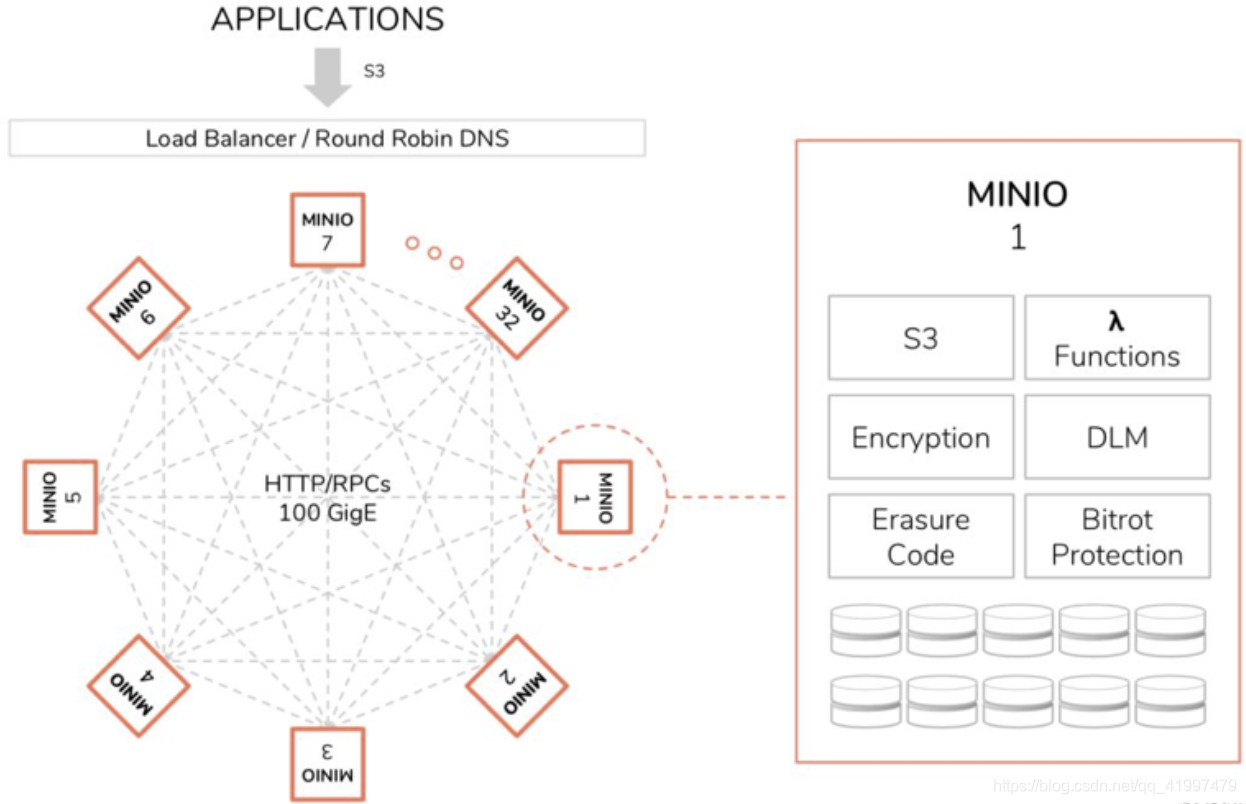
官方定义:高性能、 分布式 的对象存储系统,MinIO与传统的存储和其他的对象存储不同的是:它一开始就针对性能要求更高的私有云标准进行软件架构设计。因为MinIO一开始就只为对象存储而设计。 所以他采用了更易用的方式进行设计,它能实现对象存储所需要的全部功能,在性能上也更加强劲,失去MinIO的易用性、高效性。 这样的结果所带来的好处是:它能够更简单的实现局有弹性伸缩能力的原生对象存储服务。
Minio架构分析
Minio采用去中心化的无共享架构,对象数据被打散存放在不同节点的多块硬盘,对外提供统一命名空间访问,并通过负载均衡或者DNS轮询在各个服务器之间实现负载均衡。
Minio集群 部署 方式:一种是本地分布式集群部署,一种是联盟模式部署。
分布式锁管理
与分布式数据库类似,Minio也会存在面临数据一致性的问题:一个客户端在读取一个对象的同时,另一个客户端可能正在修改或者删除这个对象。为了避免出现不一致的情况。Minio专门设计并实现了dsync分布式锁管理器,来控制数据一致性。
- 任何一个节点的锁请求都会广播给集群内的所有在线节点
- 如果收到N/2+1个节点的同意,则获取锁成功
- 没有主节点,每个节点互相对等,节点间通过stale lock检测机制,判断节点的状态及持有锁情况
- 由于设计简单,比较粗糙。有一定的缺陷性,最多支持32个节点。无法避免锁丢失的场景。不过基本满足可用需求。
数据结构:
Minio对象存储系统把存储资源组织为租户-桶-对象的形式。
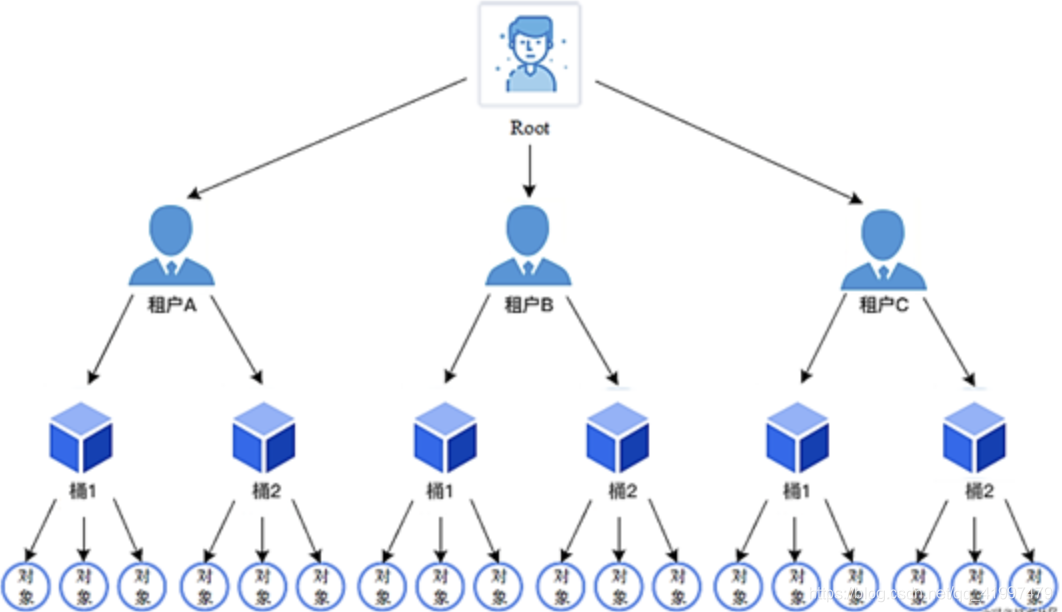
- 对象:类似于hash表中的表项,名字是关键字,内容相当于值
- 桶(bucket):是若干个对象的逻辑抽象,是盛装对象的容器
- 租户:用于隔离存储资源。在租户下可以建立桶、存储对象
- 用户:在租户下面创建的用于访问不同桶的账号。可以使用minio提供的mc命令设置不同用户访问各个桶的权限
git相关
图解git
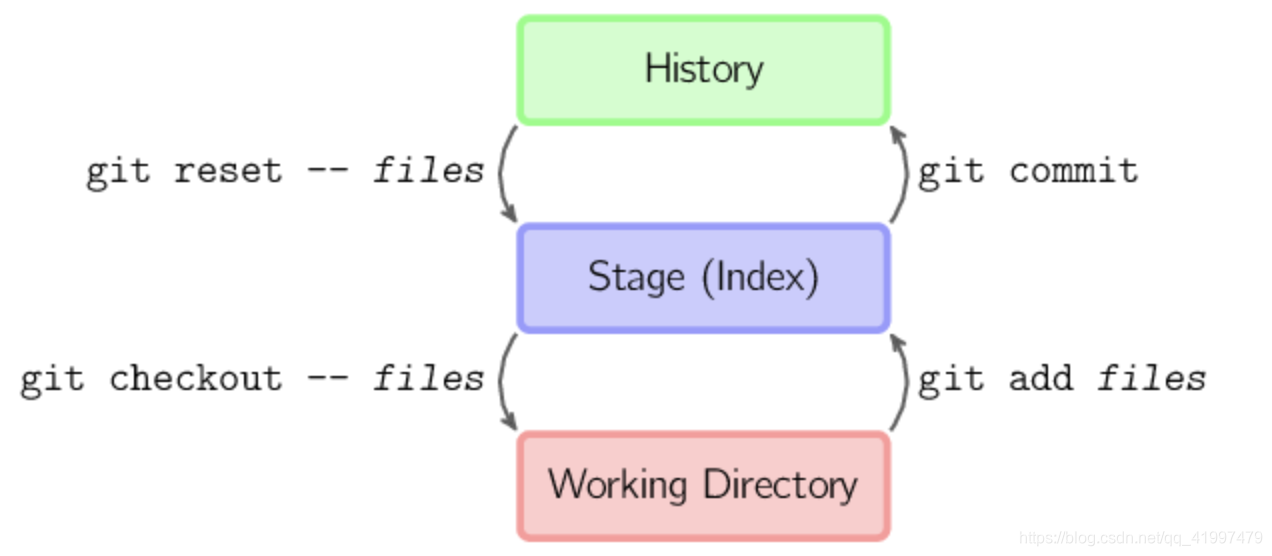
- git checkout – files 把文件从暂存区域复制到工作目录,用来丢弃本地修改。
免责声明:本文系网络转载或改编,未找到原创作者,版权归原作者所有。如涉及版权,请联系删


 技术文档
技术文档
 推荐好文
推荐好文


 155-2731-8020


