


软件

产品


备战数模,还是知道多点好。networkx这个库的话,画网络图贼好用。
一、安装
安装的话,跟其他包的安装差不多吧。我用的是anaconda就不用装了。其他的话,就用pip install networkx吧,最好的话,需要装下malplotlib这个库。
二、建立图
import networkx as nxG=nx.Graph()#创建空的简单图G=nx.DiGraph()#创建空的简单有向图G=nx.MultiGraph()#创建空的多图G=nx.MultiDiGraph()#创建空的有向多图加点、加边
G.add_node(1)#加1这个点G.add_node(1,1)#用(1,1)这个坐标加点G.add_nodes_from([2,3])#加列表中的点 G.add_edge(1,2)#加边,起点是1终点是2G.add_weight_edge(1,2,3.0)#第三个是权值G.add_edges_from(list)#添加列表中的边G.add_weight_edges_from(list)删除点和边的话
G.remove_node()G.remove_nodes_from()G.remove_edge()G.remove_edges_from()G.clear()遍历点和边的话
G.add_nodes_from([1,2,3])for n in G.nodes(): print(n)G.add_edges_from([(1,2),(1,3)])for e in G.edges(): print(e)print(G.degree())输出:
123(1, 2)(1, 3)[(1, 2), (2, 1), (3, 1)]#1这个点有两条边连着,2、3只有一条边连着一些特殊的图的生成:
k_5=nx.complete_graph(5)#完全图k_3_3=nx.complete_bipartite_graph(3,3)#完全二分图三、画网络图


   这就要用到matplotlib这个库了。
from matplotlib import pyplot as pltimport networkx as nxG=nx.Graph()G.add_nodes_from([1,2,3])G.add_edges_from([(1,2),(1,3)])nx.draw_networkx(G)plt.show()输出:
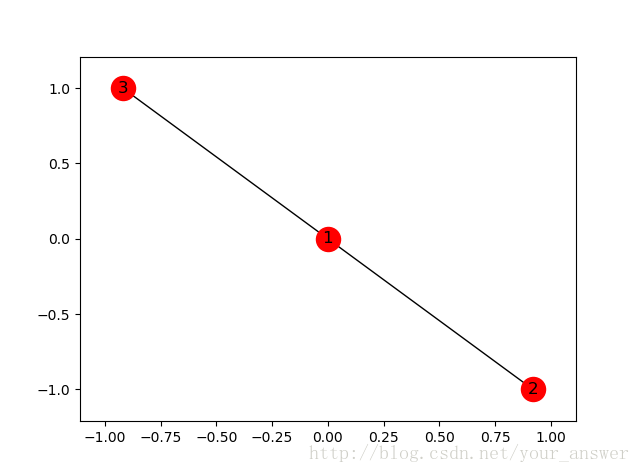
这个应该是最简单的用法了。复杂的图的,还有各种参数的使用只能去networkx的GitHub上看了
四、最短路径的运用
1、无权无向图最短路径
from matplotlib import pyplot as pltimport networkx as nxG=nx.path_graph(5)path=nx.single_source_shortest_path(G,2)length=nx.single_source_shortest_path_length(G,2)print(path)print(length)nx.draw_networkx(G)plt.show()输出:
{2: [2], 1: [2, 1], 3: [2, 3], 0: [2, 1, 0], 4: [2, 3, 4]}{2: 0, 1: 1, 3: 1, 0: 2, 4: 2}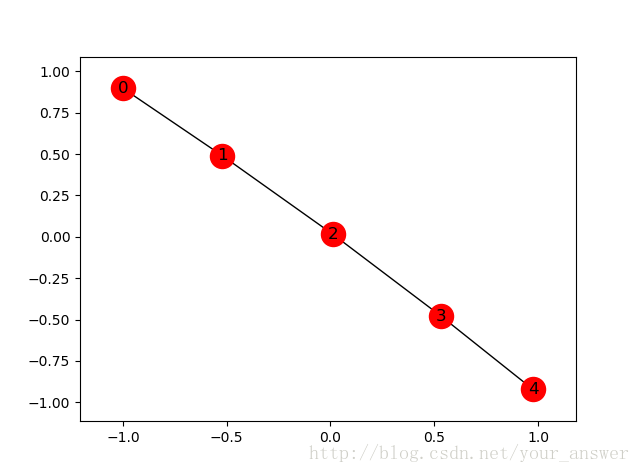
2、有权无向图
以我上个博客为例子吧。
from matplotlib import pyplot as pltimport networkx as nxnodes=[0,1,2,3,4]edges=[(0,1,10),(0,3,30),(0,4,100),(1,2,50),(2,3,20),(2,4,10),(3,4,60)]G=nx.Graph()G.add_nodes_from(nodes)G.add_weighted_edges_from(edges)path=nx.single_source_dijkstra_path(G,4)length=nx.single_source_dijkstra_path_length(G,4)print(path)print(length)nx.draw_networkx(G)plt.show()输出:
{4: [4], 0: [4, 2, 3, 0], 2: [4, 2], 3: [4, 2, 3], 1: [4, 2, 1]}{4: 0, 2: 10, 3: 30, 1: 60, 0: 60}
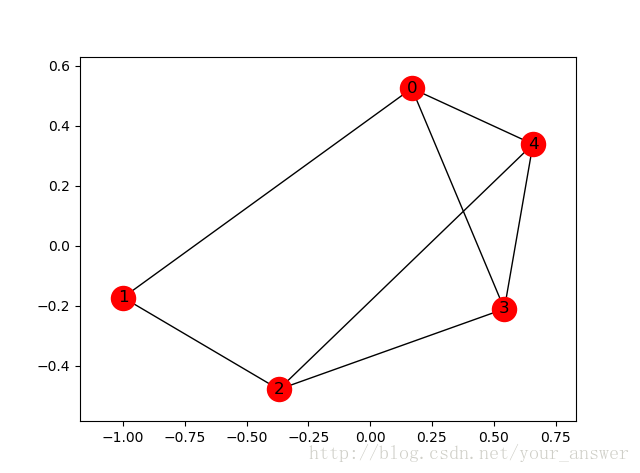
可以好好跟我的上个博客对比一下。
五、参考
https://networkx.github.io/documentation/networkx-1.9
免责声明:本文系网络转载或改编,未找到原创作者,版权归原作者所有。如涉及版权,请联系删
 技术文档
技术文档
 推荐好文
推荐好文


 155-2731-8020


