


软件

产品


参考:
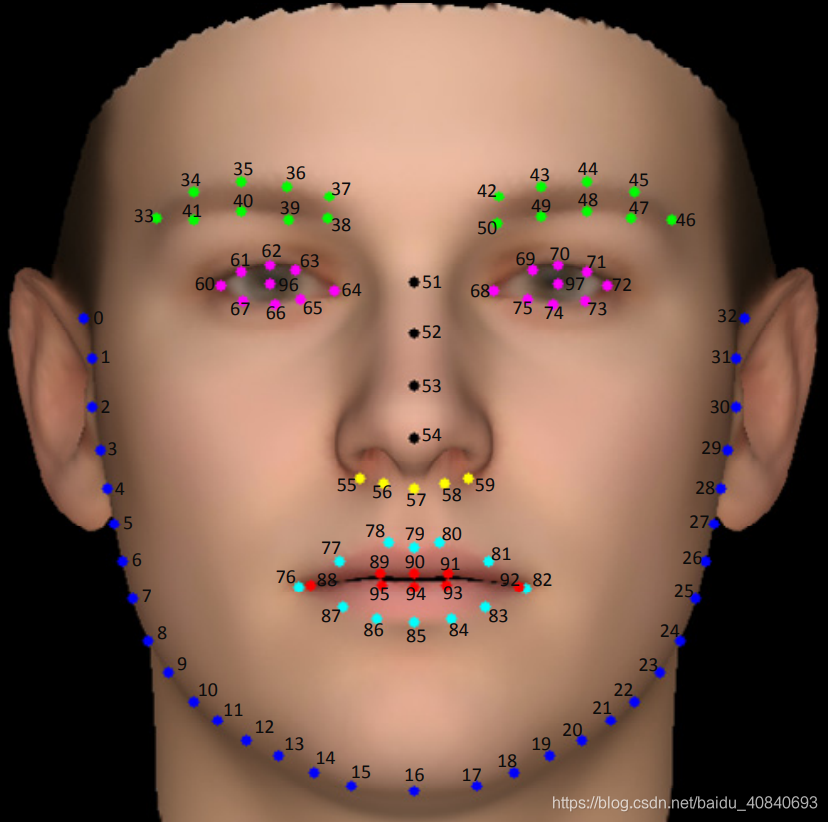
由6,14以及68点人脸关键点计算头部姿态
dlib https://www.zhihu.com/question/34524316
模型:https://astuteinternet.dl.sourceforge.net/project/dclib/dlib/v18.10/shape_predictor_68_face_landmarks.dat.bz2
https://blog.csdn.net/ChuiGeDaQiQiu/article/details/88623267
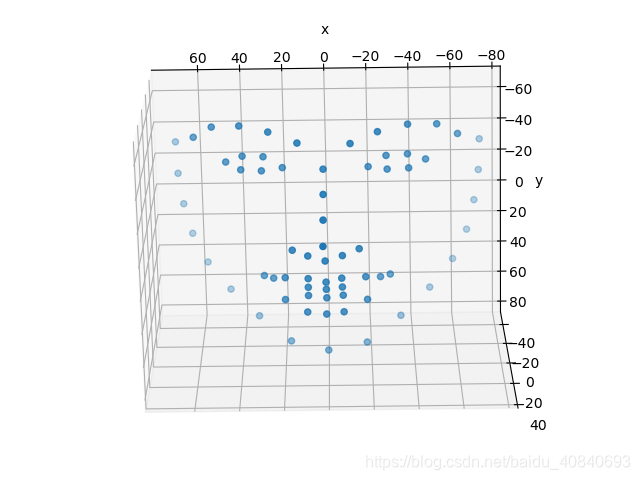
3D数据
https://github.com/yinguobing/head-pose-estimation
https://www.learnopencv.com/facial-landmark-detection/
重磅!头部姿态估计「原理详解 + 实战代码」来啦!:
https://zhuanlan.zhihu.com/p/51208197
使用opencv和dlib进行人脸姿态估计( python )
https://blog.csdn.net/yuanlulu/article/details/82763170
head-pose-estimation--提供3D模型
https://github.com/YadiraF/face3d
https://github.com/lincolnhard/head-pose-estimation
其中关于可视化的一些问题:参考:https://github.com/lincolnhard/head-pose-estimation
比如
还有这种:

最近在弄代码:
PFLD- pytorch -github
使用数据集WFLW 下载 地址:
https://wywu.github.io/projects/LAB/WFLW.html
我刚开始不知道有官方的,自己写了一个,然后发现,有的landmark比框大,使用最下外接矩形改了一下,先上
import osimport cv2import numpy as np # self.img = cv2.imread(self.line[0])# self.landmark = np.asarray(self.line[1:197], dtype=np.float32)# self.attribute = np.asarray(self.line[197:203], dtype=np.int32)# self.euler_angle = np.asarray(self.line[203:206], dtype=np.float32) def groberect(points, ww, hh): x1 = points[0] y1 = points[1] x2 = points[2] y2 = points[3] w = x2 - x1 + 1 h = y2 - y1 + 1 px = float(x1 + x2) / 2 py = float(y1 + y2) / 2 w = w * 1.3 h = h * 1.3 l = max(0, px - w / 2) r = min(ww - 1, px + w / 2) t = max(0, py - h / 2) b = min(hh - 1, py + h / 2) # x1 y1 x2 y2 return [int(l), int(t), int(r), int(b)] file_ynh = open("./WFLW_annotations/list_98pt_rect_attr_train_test/list_98pt_rect_attr_train.txt",'r')lines = file_ynh.readlines()count = len(lines)num = 1for line in lines: print(num, "/", count) num += 1 line = line.strip().split() landmark = line[0:196] detection = line[196:200] attributes = line[200:206] name = line[206:207] img = cv2.imread("./WFLW_images/" + str(name[0])) if img is None: exit() continue h,w = img.shape[0:2] # cv2.rectangle(img, (int(detection[0]),int(detection[1])), (int(detection[2]),int(detection[3])), (0, 255, 0), 2, 8) # for index in range(0, len(landmark), 2): # cv2.circle(img, (int(float(landmark[index])), int(float(landmark[index+1]))), 1, (255, 0, 0), -1) # cv2.imshow("img.jpg", img) # cv2.waitKey(0) detection = list(map(int, detection)) rect = groberect(detection, w, h) rectimg = img[rect[1]:rect[3],rect[0]:rect[2],:] landmark = list(map(float, landmark)) for index in range(0, len(landmark), 2): if( (landmark[index]-rect[0])<0 or (landmark[index+1]-rect[1])<0 ): print("特征点超出扩展框,应该改变策略,使用特征点和原始框的最小外接矩形做扩展框") print(landmark[index]-rect[0],"\n") print(landmark[index+1]-rect[1], "\n") cv2.circle(rectimg, (int(landmark[index]-rect[0]), int(landmark[index+1]-rect[1])), 1, (255, 0, 0), -1) cv2.imwrite("./result/"+"img_%s.jpg"%(str(num)), rectimg) # cv2.imshow("rectimg.jpg", rectimg) # cv2.waitKey(0) file_ynh.close()写完自己的代码才发现,官方有,我,,,,,,内心羊驼在奔跑。。。。。。。。官方的放在了最后
import osimport cv2import numpy as np # self.img = cv2.imread(self.line[0])# self.landmark = np.asarray(self.line[1:197], dtype=np.float32)# self.attribute = np.asarray(self.line[197:203], dtype=np.int32)# self.euler_angle = np.asarray(self.line[203:206], dtype=np.float32) def groberect(points, ww, hh):    x1 = points[0]    y1 = points[1]    x2 = points[2]    y2 = points[3]     w = x2 - x1 + 1    h = y2 - y1 + 1    px = float(x1 + x2) / 2    py = float(y1 + y2) / 2     w = w * 1.2    h = h * 1.2     l = max(0, px - w / 2)    r = min(ww - 1, px + w / 2)    t = max(0, py - h / 2)    b = min(hh - 1, py + h / 2)     # x1 y1 x2 y2    return [int(l), int(t), int(r), int(b)] file_ynh = open("./WFLW_annotations/list_98pt_rect_attr_train_test/list_98pt_rect_attr_train.txt",'r')lines = file_ynh.readlines()count = len(lines)num = 1for line in lines:    print(num, "/", count)    num += 1    line = line.strip().split()    landmark = line[0:196]    detection = line[196:200]    attributes = line[200:206]    name = line[206:207]    img = cv2.imread("./WFLW_images/" + str(name[0]))    if img is None:        exit()        continue    h,w = img.shape[0:2]     # cv2.rectangle(img, (int(detection[0]),int(detection[1])), (int(detection[2]),int(detection[3])), (0, 255, 0), 2, 8)    # for index in range(0, len(landmark), 2):    # cv2.circle(img, (int(float(landmark[index])), int(float(landmark[index+1]))), 1, (255, 0, 0), -1)    # cv2.imshow("img.jpg", img)    # cv2.waitKey(0)     landmark = list(map(float, landmark))    new_landmark = []    for index in range(0, len(landmark), 2):        new_landmark.append([landmark[index], landmark[index+1]])     landmark_array = np.asarray(new_landmark)    xmax, ymax = landmark_array.max(axis=0)    xmin
免责声明:本文系网络转载或改编,未找到原创作者,版权归原作者所有。如涉及版权,请联系删
 技术文档
技术文档
 推荐好文
推荐好文


 155-2731-8020


